Improve laptop performance by deleting temporary files
Laptops can experience a gradual decline in performance over time. One common problem for this slowdown is the accumulation of temporary files. These files, generated during various processes, can clog up your laptop’s storage and hinder its speed. In this comprehensive guide, we’ll explore the reasons behind the performance impact of temporary files and provide a step-by-step approach to improve your laptop’s performance by efficiently deleting them.
Understanding Temporary Files: The Culprits of Performance Lag
Temporary files serve a purpose during various operations on your laptop. They are created by the operating system and applications to store temporary data, cache information, and facilitate smoother functionality. However, as time goes on, these files can accumulate and become redundant, contributing to a decline in performance. Here’s how temporary files impact your laptop:
- Storage Space Congestion: Temporary files, if left unchecked, can consume a significant portion of your laptop’s storage space. This can lead to a lack of free space, affecting the overall speed and responsiveness of your system.
- System Resource Utilization: Even though temporary files are meant to be temporary, some may linger longer than necessary. When numerous unnecessary files exist, they consume system resources, including RAM and CPU power, diverting them from more critical tasks.
- Fragmentation and Slowdown: The presence of a large number of temporary files can contribute to disk fragmentation. This fragmentation can slow down file access times, leading to a sluggish user experience.
Step-by-Step Guide to Improving Laptop Performance by Deleting Temporary Files:
-
Table of Contents
ToggleWindows Disk Cleanup Utility:

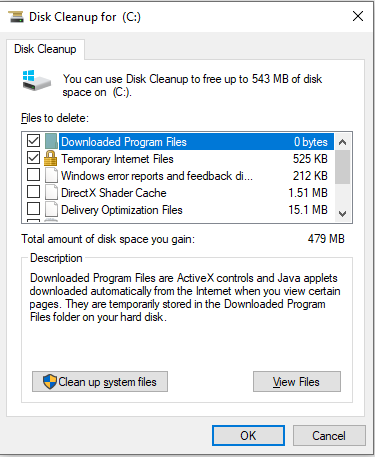
- Access Disk Cleanup: In the search bar, type “Disk Cleanup” and select the corresponding utility. Alternatively, you can find it by right-clicking on the drive you want to clean (usually C:), selecting “Properties,” and then clicking on “Disk Cleanup.”
- Select Drive and File Types: Choose the drive you want to clean, and the utility will calculate the amount of space you can free up. Select the types of files you want to delete, including temporary files, and click “OK.”
- Confirm Deletion: After selecting the file types, click “Delete Files” to confirm. The utility will clean up the selected temporary files, freeing up valuable storage space.
-
Manual Deletion of Temporary Files:
- Navigate to Temp Folder: Press the Windows key + R to open the Run dialog. Type “%temp%” and press Enter. This will open the Temp folder containing various temporary files.
- Select and Delete: Press Ctrl + A to select all files and folders in the Temp folder. Press the Delete key to remove them. Some files may be in use and might not be deleted immediately, but you can skip them.
- Empty Recycle Bin: After deleting the files, empty the Recycle Bin to free up the space on your laptop completely.
-
Use Storage Sense in Windows 10 and 11:

- Open Settings: Press the Windows key + I to open the Settings menu. Navigate to “System” and then “Storage.”
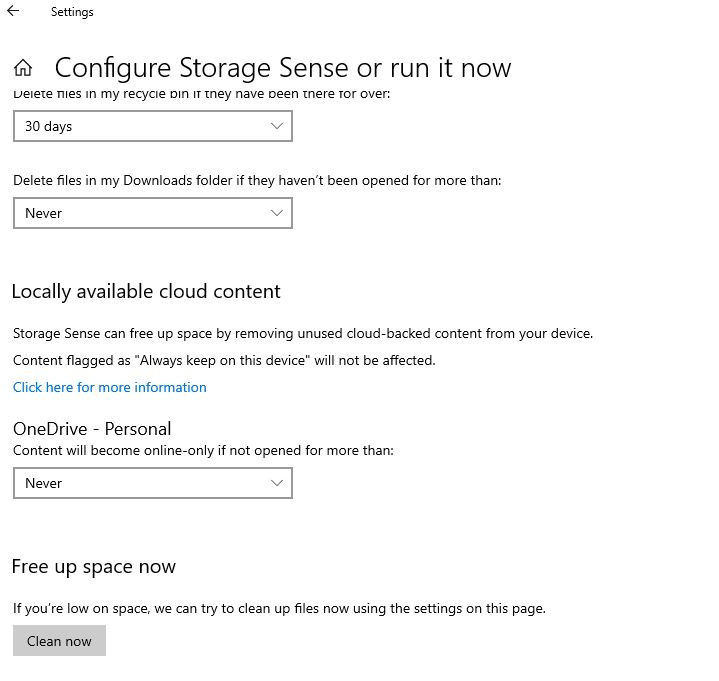
- Enable Storage Sense: Toggle on “Storage Sense” to enable automatic cleanup. Click on “Configure Storage Sense or run it now” to customize settings such as the frequency of cleanup and types of files to delete.
- Run Storage Sense: Click on “Clean now” to initiate an immediate cleanup according to the configured settings.
-
CCleaner:
- Download and Install CCleaner: CCleaner is a third-party tool that streamlines the process of cleaning temporary files. Download and install it from the official website.
- Run CCleaner: Open CCleaner and go to the “Cleaner” tab. Select the types of files you want to delete, including temporary files, and click on “Run Cleaner.”
- Registry Cleaner (Optional): CCleaner also includes a Registry Cleaner feature. Use it cautiously, as the Windows Registry is a sensitive area. Create a backup before running the Registry Cleaner.
-
Browser Cleanup:
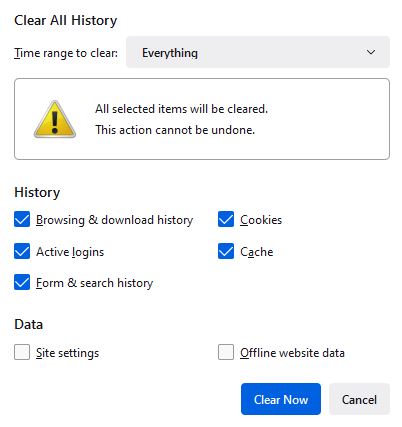
- Clear Browser Cache: Each web browser stores temporary files, such as cached images and cookies. Clearing these files can improve browser performance.

-
- Google Chrome: Click on the three dots in the top-right corner, go to “More tools,” and select “Clear browsing data.”
- Mozilla Firefox: Click on the three horizontal lines, go to “Library,” and select “History.” Click on “Clear Recent History.”
- Microsoft Edge: Click on the three dots, go to “Settings,” and choose “Privacy, search, and services.” Under “Clear browsing data,” click “Choose what to clear.”
- Manage Browser Extensions: Some browser extensions may contribute to slowdowns. Review and remove unnecessary extensions to streamline your browser’s performance.
Conclusion:
A Swifter, More Responsive Laptop
By diligently deleting temporary files from your laptop, you can revitalize its performance and enjoy a swifter, more responsive computing experience. Whether utilizing built-in Windows utilities, third-party tools like CCleaner, or performing manual cleanup, these steps ensure that your laptop’s storage space is optimized, and unnecessary files are kept at bay. Make temporary file cleanup a regular part of your laptop maintenance routine, and witness the noticeable difference in speed and efficiency.


