A clean boot in Windows is a powerful troubleshooting technique designed to identify and resolve issues related to software conflicts and system performance. By starting your computer with only essential drivers and programs, you can pinpoint the root cause of problems and enjoy a smoother, more efficient system. In this guide, we’ll walk you through the step-by-step process of performing a clean boot on Windows, complete with detailed instructions and helpful screenshots.
Understanding the Clean Boot Concept
Before we dive into the practical steps, let’s briefly explore the concept of a clean boot. When your computer starts, various programs and services launch simultaneously. These include both essential system processes and third-party applications. Over time, conflicts between these programs can arise, leading to performance issues, crashes, or errors.
A clean boot helps you isolate these conflicts by loading only the necessary system components and Microsoft services during startup. This allows you to identify and disable problematic third-party software that may be causing disruptions.
Step 1: Preparing for a Clean Boot
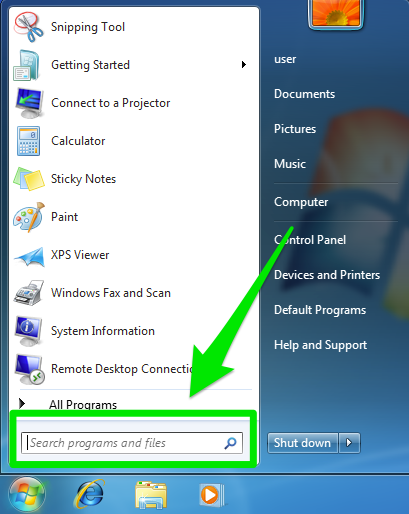
- Access the Start Menu: Click on the Start menu in the bottom left corner of your screen or press the Windows key on your keyboard.
- Type “msconfig”: In the search bar, type “msconfig” and press Enter. This will open the System Configuration utility.
- Select the System Configuration Utility: From the search results, click on “System Configuration” to launch the utility.
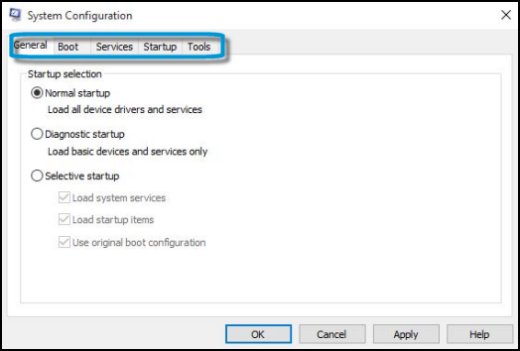
- Navigate to the General Tab: In the System Configuration window, go to the “General” tab. Here, you’ll find options to configure the startup behavior of your system.
Step 2: Configuring Selective Startup
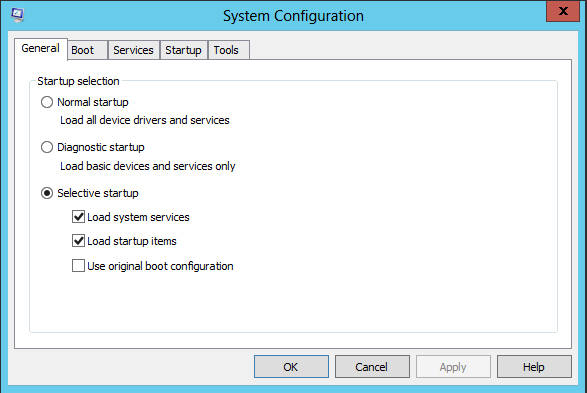
- Choose Selective Startup: Under the General tab, select the “Selective startup” option. This will allow you to customize which components load during startup.
- Uncheck Load Startup Items: Within the Selective Startup section, uncheck the box next to “Load startup items.” This step ensures that only essential services and drivers load during the clean boot.
- Check Load System Services: Make sure the “Load system services” option is checked. This ensures that critical Windows services are still active.
- Click Apply and OK: After making these selections, click “Apply” and then “OK” to save your changes. The System Configuration utility will prompt you to restart your computer.
Step 3: Restarting Your Computer in a Clean Boot State
- Restart Your Computer: A pop-up window will appear, asking if you want to restart your computer. Click “Restart” to initiate the clean boot.
- Verification Process: Upon restarting, your computer will now operate in a clean boot state. This means that only essential services and drivers are running.
Step 4: Identifying and Resolving Issues

- Testing for Issues: Use your computer as you normally would in this clean boot state. If the issues you were experiencing no longer occur, it indicates that a third-party program or service was likely causing the problem.
- Enabling Startup Items: To identify the specific culprit, return to the System Configuration utility (follow steps in Step 1 and 2) and selectively re-enable startup items. Restart your computer after each enabling process until you identify the problematic application.
- Uninstall or Update Problematic Software: Once identified, consider uninstalling or updating the problematic software to prevent future conflicts.
Conclusion:
Streamlining Your System for Optimal Performance
Performing a clean boot on Windows is a valuable troubleshooting technique that empowers users to identify and resolve software conflicts impacting system performance. By following these step-by-step instructions, accompanied by helpful screenshots, you can confidently navigate the clean boot process.
Regularly incorporating clean boots into your system maintenance routine can lead to a more stable and efficient computing experience. It allows you to enjoy the full potential of your Windows operating system by minimizing the impact of conflicting software and unnecessary startup items.
Remember, while a clean boot is an effective tool for resolving issues, always exercise caution when making changes to your system configuration. If you encounter challenges or uncertainties during the process, consult with your device manufacturer’s support or seek guidance from Microsoft’s official support channels. A clean boot can be a game-changer for system optimization, helping you achieve a streamlined and trouble-free computing experience.