Table of Contents
ToggleCalibrate your machine
Here are the steps to follow:
- Turn on your Cricut machine and connect it to your computer or mobile device.
- Open the Cricut Design Space software or app and create a new project.

- Add a new image or upload an image that you want to use for your Print Then Cut project.
- Resize your image to the desired size and position it on the virtual mat.
- Select the “Make It” button in the top right corner of the screen.
- In the next screen, select the “Print Then Cut” option.

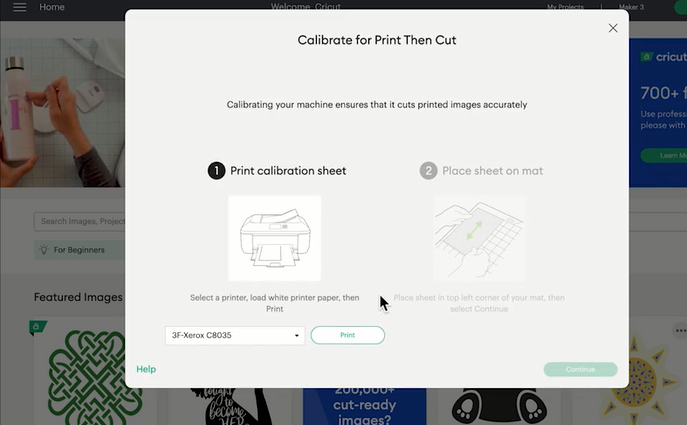
- Follow the on-screen instructions to print out the calibration sheet provided by Cricut.

- Once you have printed the calibration sheet, place it on a flat, well-lit surface and ensure that it is free from wrinkles or creases.
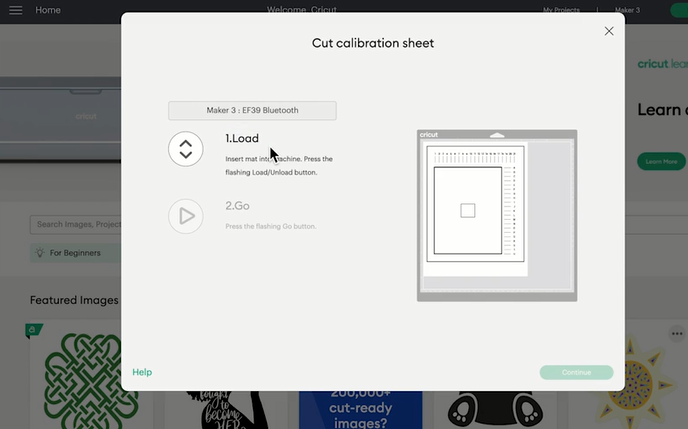
- Load the calibration sheet into your Cricut machine and follow the on-screen prompts to calibrate your machine.
- Once the calibration is complete, select “Continue” to proceed with your Print Then Cut project.
- Print your design on your printer using the “Print” button in the Cricut Design Space software or app.
- Load the printed sheet onto your Cricut cutting mat and follow the on-screen prompts to cut out your design.
- Your Print Then Cut project should now be complete!
Make Stickers
To make stickers with Print Then Cut in Cricut Design Space, follow these steps:
- Open Cricut Design Space and create a new project.
- Select “Upload” and choose an image or design that you want to turn into a sticker. Adjust the size and position of the image as desired.
- Select “Make It” in the top right corner of the screen.
- On the next screen, select “Print Then Cut” as the project type.
- Select “Send to Printer” and choose your printer settings, then print your design on a sheet of white sticker paper. Note that you must use inkjet printable sticker paper to ensure the colors come out properly.
- Once the design is printed, place the sheet on a Cricut cutting mat and load it into the machine.
- Follow the on-screen prompts to calibrate your machine, if necessary.
- Select “Go” to start the cutting process.
- Once the machine has finished cutting, remove the excess sticker paper from the mat, leaving only your newly cut stickers.
- Peel the stickers from the backing and they are ready to use!
Make Stickers with Offset
To make stickers with an offset in Cricut Design Space, follow these steps:
- Open Cricut Design Space and create a new project.
- Select “Upload” and choose an image or design that you want to turn into a sticker. Adjust the size and position of the image as desired.
- Select the image and click on “Offset” in the bottom right corner of the screen.
- Adjust the offset distance to the desired size. This will create a new shape around the original image, which will become the outline of the sticker.
- Adjust the corner type and corner roundness as desired.
- Select “Apply” to create the offset shape.
- Resize and position the offset shape as desired, then select both the original image and the offset shape.
- Select “Slice” in the bottom right corner of the screen. This will create two new shapes, one for the original image and one for the offset shape.
- Delete the original image and keep the offset shape, which is now a separate object.
- Select the offset shape and adjust the size and position as desired.
- Select “Make It” in the top right corner of the screen.
- On the next screen, select “Print Then Cut” as the project type.
- Select “Send to Printer” and choose your printer settings, then print your design on a sheet of white sticker paper.
- Once the design is printed, place the sheet on a Cricut cutting mat and load it into the machine.
- Follow the on-screen prompts to calibrate your machine, if necessary.
- Select “Go” to start the cutting process.
- Once the machine has finished cutting, remove the excess sticker paper from the mat, leaving only your newly cut stickers.
- Peel the stickers from the backing and they are ready to use!


