XLSX Spreadsheet Editor - Help File
XLSX Spreadsheet Editor is a versatile and user-friendly alternative to Microsoft Excel, designed for both entry-level users and professionals. It offers robust features such as advanced formulas, data visualization with customizable charts, and comprehensive cell formatting options. Users can easily manage workbooks and worksheets, perform complex data analysis with pivot tables, and execute mail merge operations. The app ensures data security with workbook encryption and worksheet protection, and provides seamless printing and exporting to various formats. With its intuitive interface and compatibility with Excel files, the XLSX Spreadsheet Editor enhances productivity and streamlines data management.
– Advertisement –
Product Support
Have questions regarding the functions of the product, license acquisition, or want to provide feedback? We love to hear from you:
- Email our support team: huxsoft[at]outlook.com (replace [at] with @)
- If you encounter an issue while using the app, please explain the nature of the problem and provide the steps to reproduce it.
- If the issue is related to a particular document, consider attaching the file to your email.
Our knowledgeable and friendly support team will get back to you in a timely manner.
Workbook and Worksheet Management
Creating and Saving Workbooks
Creating a New Workbook:
- To create a new workbook, go to the ‘File’ menu and select ‘New’. This will open a blank workbook with a default sheet.
- You can also use the shortcut Ctrl+N to quickly create a new workbook.
Saving Workbooks:
- Save your workbook by selecting ‘Save’ or ‘Save As’ from the ‘File’ menu.
- Choose the desired location, enter a file name, and select the format (e.g., .xlsx).
- Use Ctrl+S to quickly save your work.
Adding, Renaming, and Deleting Worksheets
Adding Worksheets:
- Click on the ‘+’ icon at the bottom of the workbook to add a new worksheet.
- Alternatively, right-click on an existing sheet tab and select ‘Insert’.
Renaming Worksheets:
- Double-click the sheet tab you wish to rename.
- Enter the new name and press Enter.
- You can also right-click the sheet tab, select ‘Rename’, type the new name, and press Enter.
Deleting Worksheets:
- Right-click on the sheet tab you wish to delete and select ‘Delete’.
- Confirm the deletion if prompted.
– Advertisement –
Cell Operations
Entering and Editing Data
Entering Data:
- Click on a cell to select it and start typing to enter data.
- Press Enter to confirm the entry and move to the cell below.
Editing Data:
- Double-click on a cell to edit its contents.
- Alternatively, select a cell and press F2 to enter edit mode.
- Make the necessary changes and press Enter to confirm.
Formatting Cells
Changing Cell Appearance:
- Right-click on a cell and select ‘Format Cells’ to open the formatting dialog.
- Adjust font, borders, fill color, and alignment options as needed.
Applying Number Formats:
- Select the cells you want to format.
- Choose the desired number format from the ‘Number’ group on the Home tab (e.g., currency, percentage, date).
Formulas and Functions
Basic Formulas
Entering Formulas:
- Start by typing an equal sign (=) in a cell.
- Enter the desired formula (e.g.,
=A1+B1) and press Enter. - The result will be displayed in the cell.
Referencing Cells:
- Use cell references to perform calculations (e.g.,
=A1*B1). - Combine different cell references and operators for more complex formulas.
Common Functions
SUM Function:
- To add a range of cells, use the SUM function (e.g.,
=SUM(A1:A10)). - Press Enter to display the sum of the selected range.
AVERAGE Function:
- To calculate the average of a range of cells, use the AVERAGE function (e.g.,
=AVERAGE(B1:B10)). - Press Enter to display the average value.
IF Function:
- The IF function performs a logical test and returns one value for a TRUE result, and another for a FALSE result (e.g.,
=IF(A1>10, "Yes", "No")). - Press Enter to display the result based on the condition.
Advanced Functions
VLOOKUP Function:
- Use VLOOKUP to search for a value in the first column of a range and return a value in the same row from a specified column (e.g.,
=VLOOKUP(C1, A1:B10, 2, FALSE)). - Press Enter to display the found value.
INDEX and MATCH Functions:
- Combine INDEX and MATCH for more flexible lookups (e.g.,
=INDEX(B1:B10, MATCH(D1, A1:A10, 0))). - Press Enter to display the result from the matching row and column.
Function Wizards and AutoComplete
Using Function Wizards:
- Access function wizards from the ‘Formulas’ tab to help insert and configure functions.
- Follow the prompts to enter the required arguments and press OK to insert the function.
AutoComplete Feature:
- Start typing a function name in a cell, and the AutoComplete feature will suggest possible functions.
- Select the desired function from the list and press Tab to insert it.
– Advertisement –
Data Visualization
Creating and Customizing Charts
Creating Charts:
- Select the data range you want to visualize.
- Go to the ‘Insert’ tab and choose the desired chart type (e.g., Column, Line, Pie).
- The chart will be inserted into the worksheet.
Customizing Charts:

- Click on the chart to select it.
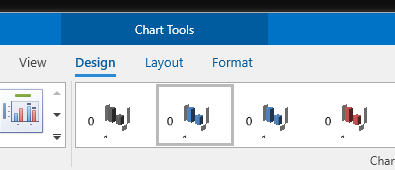
- Use the ‘Chart Tools’ to format and customize the chart (e.g., change colors, add data labels, adjust axis settings).
- Right-click on chart elements to access more formatting options.
Conditional Formatting
Applying Conditional Formatting:

- Select the cells you want to format.
- Go to the ‘Home’ tab and click on ‘Conditional Formatting’.
- Choose a formatting rule (e.g., Highlight Cells Rules, Top/Bottom Rules, Data Bars, Color Scales).
- Set the specific parameters for the rule (e.g., which values to highlight, color scales).
- Click ‘OK’ to apply the rule.
Managing Rules:
- Go to the ‘Home’ tab.
- Click on ‘Conditional Formatting’ and select ‘Manage Rules’.
- In the Conditional Formatting Rules Manager, you can edit, delete, or reorder the rules.
Conditional Formatting Rules Manager:
- Displays all rules for a selected document area.
- Allows creating new rules, editing, or removing existing ones.
- Shows rule description, format, applies to range, and precedence.
Creating and Editing Rules:
- Click ‘New Rule’ to create a new formatting rule.
- Click ‘Edit Rule’ to modify an existing rule.
Advanced Features
Pivot Tables
Creating Pivot Tables:
- Select the data range for the pivot table.
- Go to the ‘Insert’ tab and click on ‘PivotTable’.
- Choose where to place the pivot table and click ‘OK’.
Configuring Pivot Tables:
- Drag fields to the Rows, Columns, Values, and Filters areas to organize your data.
- Use the ‘PivotTable Tools’ to adjust settings and apply formatting.
Data Sorting, Filtering, and Grouping
Sorting Data:
- Select the column to sort.
- Go to the ‘Data’ tab and choose ‘Sort Ascending’ or ‘Sort Descending’.
Filtering Data:
- Click on the filter icon in the column header.
- Select the criteria to filter the data and click ‘OK’.
Grouping Data:
- Select the rows or columns to group.
- Go to the ‘Data’ tab and click on ‘Group’.
Security and Permissions
Protecting Workbooks and Worksheets
Protecting a Workbook:
- Go to the ‘Review’ tab on the toolbar.
- Click on ‘Protect Workbook’.
- Set a password if desired and click ‘OK’. This will restrict users from making structural changes to the workbook.
Protecting a Worksheet:
- Select the worksheet you want to protect.
- Go to the ‘Review’ tab and click on ‘Protect Sheet’.
- Set a password and select the actions you want to allow for users. Click ‘OK’ to apply protection.
Unprotecting Workbooks and Worksheets:
- To remove protection, go to the ‘Review’ tab and click on ‘Unprotect Workbook’ or ‘Unprotect Sheet’.
- Enter the password if prompted and click ‘OK’.
Encryption Options
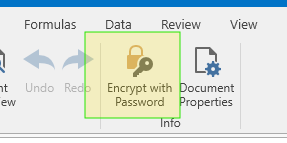
Encrypting a Workbook:

- Go to the ‘File’ menu.
- Click on ‘Encrypt with Password’.
- Enter a password and click ‘OK’. Re-enter the password to confirm.
Removing Encryption:
- Go to the ‘File’ menu.
- Click on ‘Encrypt with Password’.
- Delete the existing password and click ‘OK’ to remove encryption.
– Advertisement –
Printing and Exporting
Print Settings
Accessing Print Settings:
- Go to the ‘File’ menu and select ‘Print’.
- Alternatively, press Ctrl+P to open the print dialog.
Configuring Print Options:
- Select the printer you want to use from the list.
- Set the number of copies and choose the pages you want to print.
- Adjust settings such as page orientation, paper size, and margins.
Previewing Before Printing:
- Click on ‘Print Preview’ to see how the document will look when printed.
- Make any necessary adjustments in the print settings.
Printing the Document:
- Once all settings are configured, click on ‘Print’ to start printing.
Exporting to Different Formats
Exporting to PDF:
- Go to the ‘File’ menu and select ‘Save As’.
- Choose ‘PDF’ from the list of file formats.
- Set the desired options and click ‘Save’.
Exporting to Excel:
- Go to the ‘File’ menu and select ‘Save As’.
- Choose ‘Excel Workbook’ from the list of file formats.
- Set the desired options and click ‘Save’.
Exporting to Other Formats:
- Go to the ‘File’ menu and select ‘Save As’.
- Choose the desired file format (e.g., CSV, HTML) from the list.
- Set the desired options and click ‘Save’.
More Guides and Tips
– Advertisement –


