HUXSoft

Creative Elements for Design Space

Product Help File

Welcome to Creative Elements for Design Space! Our app provides access to tens of thousands of SVG designs and icons to help you find the perfect design elements for your next creative project. Browse, search, and download creative elements in SVG format and use them seamlessly in SVG design editors such as Cricut Design Space©. With Design Elements, you can easily elevate your designs without the hassle of creating your own graphics from scratch.

Product support

Have questions regarding the functions of the product, license acquisition, or want to provide product feedback? We love to hear from you:

  • Email our support team: huxsoft@outlook.com
  • If you have encountered an issue while using the app, explain the nature of the problem, with steps to follow in order to reproduce it
  • If the issue is related to a particular SVG design file, please consider attaching the file to your email

Our knowledgeable and friendly support team member will get back to you in a timely manner.

Launch the application

  • Click the Windows Start button
  • Type “Creative Elements for Design Space”
  • Identify the matching application entry in search result with this icon
  • Click the application entry to launch the application

Please note: an Internet connection is required to use the main functions of the app.

Application window

Creative Elements for Design Space boasts a well-designed application window, carefully divided into three functional areas. The layout of the application simplifies the process of finding design elements for users’ DIY projects.

  1. The Design Collection List: This section features a curated list of design element collections. Users can explore these collections to discover a wide variety of creative resources that suit their project requirements.
  2. The Creative Elements List: In this area, users can view the search results, consisting of a list of SVG designs and icons. This comprehensive collection caters to diverse design preferences, enabling users to find the perfect assets for their creative endeavors.
  3. The Creative Element Preview Pane: This dedicated pane showcases the currently selected SVG design or icon in a larger scale. Users can examine the details and make informed decisions before downloading the asset.

By organizing the application window into these three functional areas, Creative Elements for Design Space simplifies the search, review, and selection process, providing users with a seamless experience for their design needs.

The Design Collection List

Within this list, users can explore a carefully curated selection of collections that offer convenient access to popular design elements favored by DIY creators and Cricut users. The list encompasses over three dozen collections thoughtfully organized into various interest areas, including Sports, Animals, Events, Nature, and People.

To explore the collections, users can effortlessly browse through the list and simply click on any collection of interest. By selecting a collection, users gain access to a range of design elements specifically associated with that particular theme. This allows users to conveniently locate and utilize design elements that align with their creative vision.
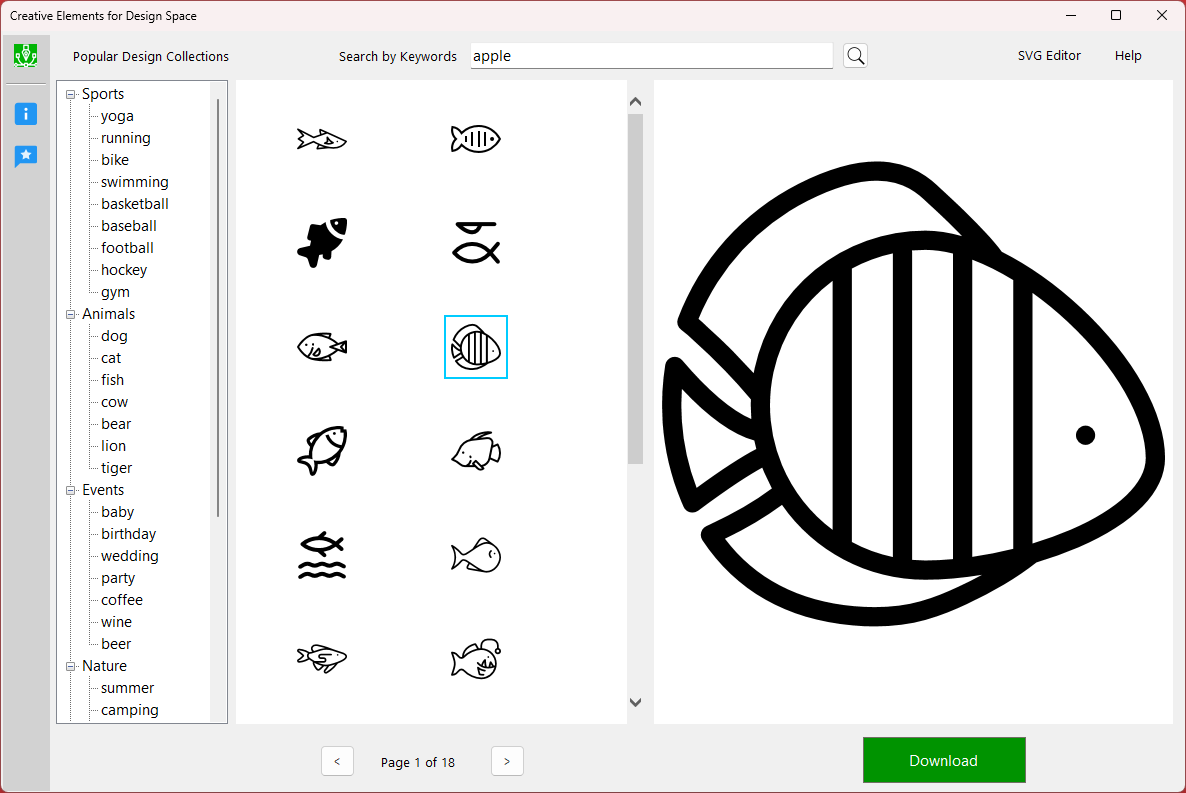
The Search Tool

To cater to your specific design requirements, Creative Elements for Design Space offers a powerful search functionality that allows you to search for SVG creative elements using keywords or phrases. The Search Tool, conveniently located in the top area of the application window, facilitates this process.

To initiate a search, simply enter a keyword or phrase into the Search Tool and press Enter or click on the magnifying glass icon. The application will then execute the search and present the results in the Creative Elements List, which allows you to review and assess the available creative elements.

The Creative Elements List

Positioned in the center of the application window, you’ll find the Creative Elements List. This list serves as a comprehensive display of SVG designs and icons, presenting the results of your search, whether initiated through a keyword search or while browsing one of the collections.

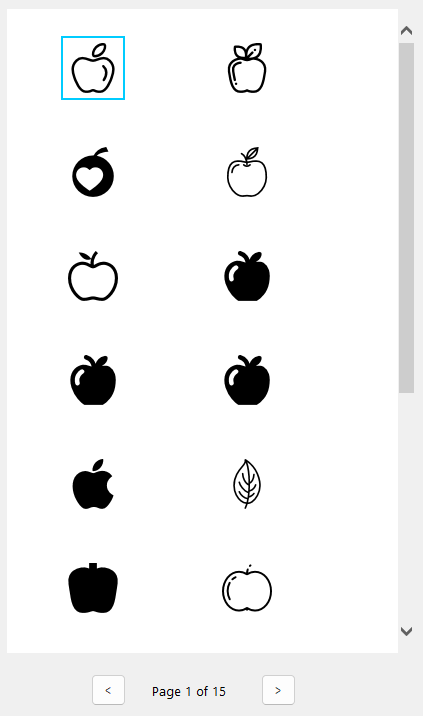
The Creative Elements List conveniently showcases up to 20 SVG elements at a time. In order to explore additional assets, you can navigate through the list by utilizing the Next button located at the bottom. By clicking this button, you will be able to access the subsequent batch of 20 elements. Similarly, if you wish to return to the previous list of 20 elements, you can simply click the Previous button

The Creative Element Preview Pane

Upon selecting a creative element from the list in the middle of the application window, it will be immediately showcased in the Preview Pane, allowing for a more expansive and detailed display. This larger view enables you to thoroughly review the intricacies of the selected element and make informed comparisons with other elements before proceeding with the download.

To download the creative element currently displayed in the preview pane, you can simply click the Download button. Upon clicking, a prompt will appear, allowing you to specify the directory or location where you would like to save the SVG design asset. Once you have chosen the desired directory, the application will initiate the download process, saving the asset to the specified location for your convenience.

How to import design elements to Cricut

Here are the step-by-step instructions for importing design elements to Cricut:

Step 1: Select Upload on the design panel to the left of the Canvas. Click on “Upload Image” to begin the process.

Step 2: Select Browse to open the file selector and locate the image file you want to use from your computer. Alternatively, you can drag and drop the file into the upload window.

Step 3: Choose the .svg or .dxf file you want to upload by selecting it in the file selector or dragging and dropping it into the Design Space image upload window.

Step 4: Name your image and add relevant tags for easier searching later. Then, click on Upload to start the upload process.

Step 5: After the upload, you will be returned to the Upload screen. The newly uploaded image will appear in the Uploaded Images Library at the bottom of the screen. To add the image to your design screen, click on the image to select it, and then click on Add to Canvas to insert it into your design screen.

Note: If your vector image contains layers, it will appear on the canvas as a grouped image. You can ungroup the image to move and resize individual layers separately, if needed.

By following these steps, you will be able to successfully import and use design elements in Cricut Design Space for your creative projects.

How to find and use fonts for Cricut design

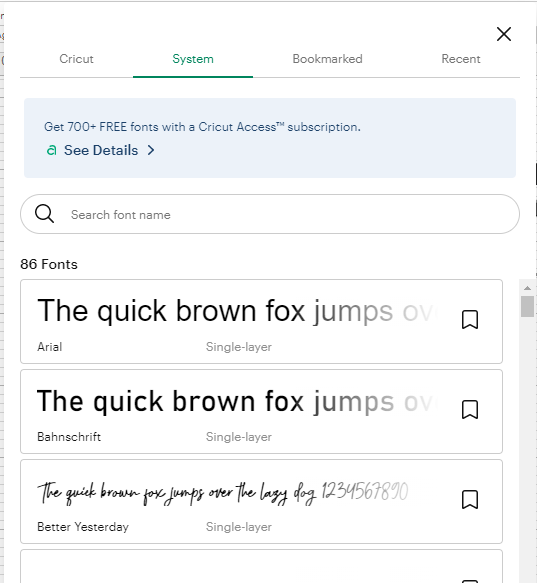
To find and use fonts for Cricut Design Space, follow these steps:

  1. In Cricut Design Space, insert a text label and select it.

  2. Locate the Font menu in the top-left corner and click the dropdown menu.

  3. Choose the “System” or “System Fonts” tab to access your installed system fonts.

  4. Select a font from the list to apply it to the text label.

To find free fonts for download, you can visit websites like:

Export design from Cricut

One of the most commonly asked questions in the Cricut community is how to export Cricut designs for sharing with others. While Cricut does not provide a direct option to export designs in vector format, there are alternative methods available. Here are some alternatives you can consider:

Option 1 – Export your design as an image file:

Exporting a Cricut design as an image file allows you to share the visual content of the design, although it may not be editable in Cricut by others. However, this method enables you to preserve the design concept. Follow these steps:

  1. Turn off the Grid display:
    • Sign in to your Cricut account.
    • In the Design Space area, click on the “View All” link on the left-hand side of the screen to access your projects.
    • Select the project you want to export.
    • Click the three lines next to the word “Canvas” in the top left corner to open the menu.
    • Scroll down and select “Settings”.
    • In the settings, turn off the “Canvas Grid” option.
  1. Capture the design using the Snipping Tool or a screenshot utility:
    • Open the Snipping Tool on your computer (you can find it in the Start menu or by searching).
    • Pin the Snipping Tool to your taskbar for easy access.
    • Use the Snipping Tool to create a screenshot of your design by drawing a box around it.
    • Once you have captured the design in the dedicated snipping box, make any necessary final checks or edits.
    • Click “Save” to save the screenshot as a JPEG file on your computer’s desktop or a preferred location.

By following these steps, you can export your Cricut design as an image file (JPEG), which can be shared with others as a visual representation of your design. You can use this file for various purposes, such as sharing electronically, emailing to clients or friends, or printing.

Please note that exporting designs as images does not provide the ability to import and edit them directly in Cricut Design Space, but it allows you to share the design concept effectively.

Option 2 – Use an external Vector design software

While it may seem counterintuitive, using an external vector design software can provide more flexibility in managing and exporting your design files when working with Cricut. By utilizing a third-party software, you can have greater control over your designs and have the ability to export and share them with others. Here are some vector design software options to consider:

  • SVG Design Editor for Creative Makers: an alternative to Cricut and designed specifically for DIY designers who works with Cricut printers
  • Adobe Illustrator: A widely-used professional design software with robust vector editing capabilities.
  • CorelDRAW: A popular vector design software that offers a range of powerful tools for creating and editing designs.
  • Inkscape: A free and open-source vector graphics editor suitable for both beginners and advanced users.
  • Affinity Designer: A feature-rich vector design software known for its intuitive interface and advanced functionality.
  • Sketch: A vector-based design tool primarily used for digital and web design projects.

By using these external vector design software options, you can create, edit, and export your designs in various formats, including vector files that can be shared and used with Cricut or other applications. This approach allows you to have more freedom in managing your design files and collaborating with others who may not have access to Cricut-specific software.

Please note that while using external vector design software provides more flexibility, you will still need to import the final design files into Cricut Design Space for cutting or production purposes.


PC Cleaner for Windows (FREE)
 – Clean, Declutter, and Unleash
the Power of Your Windows PC

Table of Contents