Install PDF Infinity
PDF Infinity is available for download from the Microsoft Store. Visit one of the following two links to get started:
PDF Infinity supports both Windows 11 and Windows 10.
Start the app
Once the application is installed, launch the app following these steps:
- Click the Windows Start button
- Type “PDF Infinity”
- Locate the matching program entry with this app icon

- Click the entry to launch the app
For ease of access in the future, you may choose to pin the program icon to the Windows taskbar. With the app running:
- Right-click the app icon from the taskbar
- Select “Pin to taskbar”
Based on common workflows of working with PDF files, the Main (application) window is conceptually divided into five functional groups: View, Annotate, Convert, Pages, and Documents, each of which offers a group of cohesively related features.
Main functional groups
The Main window is organized into five functional groups (a.k.a. functional modes): View, Annotate, Convert, Pages, and Documents. The View group provides options for viewing and navigating PDF files, while the Annotate group offers tools for highlighting, underlining, and adding notes to specific parts of a document. The Convert group allows users to convert PDFs to other formats, such as Word or Excel, and vice versa. The Pages group offers options for rearranging, rotating, or deleting pages in a PDF file, while the Documents group provides features for organizing and managing multiple PDF files at once.
![]()
Switching across the Main functional groups is made easy by clicking one of the five links located at the top-center of the Main window. However, it is important to note that any unsaved changes will need to be saved before jumping to or back to a particular functional group. Specific functions of each group are explained in detail in the sections to follow.
Application toolbars
The toolbars are located in the top area of the main window. There are two groups of toolbars:
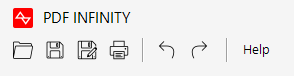
- The Main toolbar: is located in the top-left corner of the application window and consists of a fixed number of buttons:
- Open
- Save / Save as
- Undo / Redo
- Help
- The Functional group toolbars: vary between the different functional groups to provide features specific to the current group. For instance, the toolbar of the View mode is shown below:
![]()
From the main toolbar, you can perform the essential tasks of opening, saving, or printing PDF files
Open PDF files
There are several ways of opening a PDF file:
- From the main toolbar:
- Click the Browse for File button

- Browse to the destination folder of the PDF file you would like to open
- Select the PDF file and click Open
- Click the Browse for File button
- From the Launch window: if the PDF file has been opened recently
- Find the entry of the PDF file from the Recently Opened File list
- Click the entry to open the file
Open other types of documents
In addition to PDF files, PDF Infinity allows you to conveniently open and view a variety of file types, such as Microsoft Office documents (Word, Excel, PowerPoint), eBooks, and common image files.
Simply click on the corresponding toolbar icons located on the left side of the View functional toolbar to open any of these file types. For non-PDF file types, a separate view window will open to display the file content.
![]()
Save PDF files
To save changes to PDF files, you can choose between Save and Save As:
- The “Save” function
 : is used to save changes to an existing file. When you use the “Save” function, any changes you have made to the file will be saved directly to the original file, overwriting the previous version. The file will still have the same name and location as before.
 - The “Save As” function
 : on the other hand, is used to save a copy of the file with a new name or in a new location. When you use the “Save As” function, a dialog box will appear asking you to choose a name and location for the new file. The original file will remain unchanged, and the new file will be saved with the name and location you specified.
Print PDF files
The View mode provides essential features allowing you to
- Open and view multiple PDF documents
- Open other types of supported documents
- Change page layout
- Adjust zoom levels
- Search for keywords
- Manage password protection
- Share PDF files
Open and close PDF files
PDF Infinity supports opening multiple PDF files currently. From the View mode, there are three ways to open a PDF file:
- Click the Browse for File button from the Main toolbar (top-left corner)
- Click the Open PDF file button
 from the functional toolbar, that is the first button after the label “Open”
 - Click the “+” sign at the File Name tab area, just above the PDF content viewer Window, as shown below

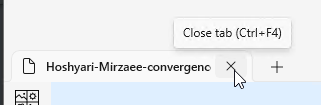
Close PDF files
To close a PDF file, click the file name tab to display the PDF file in the convent view window, and then click the Close button marked with X as shown below:
Page navigation
You can navigate through a PDF file using one of the following methods:
- Use the Page Up or Page Down keys on your keyboard
- Use the Page Navigation control located at the bottom of the View window. Type a page number in the edit box and press Enter, or use one of the four buttons, from left to right:
- First page
- Previous page
- Next page
- Last page
![]()
- Use the Thumbnail Navigation control
 located at the left side of the View window and click on any of the page thumbnails to jump to that page.
 - Use the Bookmarks Navigation control
 , which is also located at the left side of the View window and click on a bookmark of your interest.
Change page layout
Choose to show PDF file in one of the three page layout options:
- Fit Width
 : adjust the PDF to fit the width of the window
 - Fit Height
 : adjust the PDF to fit the height of the window
 - Fit Page
 : adjust the PDF to fit the entire page within the window
All page layout options maintains the aspect ratio of page display.
Adjust zoom level
![]()
Use the Zoom level controls to adjust the display of PDF content by zooming in or out:
- Click the minus sign “-” to zoom out
- Click the plus sign “+” to zoom in
- Utilize the dropdown combo selection box to select a preset zoom level for the content display.
Search PDF
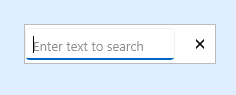
- Click the Search button from
 the functional toolbar
 - Locate the Search text box appears in the top-right corner of the view window
- Click and type the keyword(s) you would like to search, and press Enter to go to the first match
- To show subsequent matches, press the Enter key again
Share PDF
To share the PDF file that is currently displayed in the view window, click the Share button ![]() from the functional toolbar, and follow instructions provided in the Share Item dialog box to complete the action.
from the functional toolbar, and follow instructions provided in the Share Item dialog box to complete the action.
The Annotate mode in the PDF app allows you to mark text content, draw lines and shapes, insert text, comments, and callouts, as well as add stamps. To access this mode, simply click the Annotate button located in the Main toolbar.
Mark text content
Add annotation marks to existing text content by using the following three features:
- Text highlight

- Text underline

- Text Strikethrough

Use the color dropdown indicator ![]() beneath the buttons to pick a particular color for marking text.
beneath the buttons to pick a particular color for marking text.
Drawing tools
The following drawing tools allow you to add drawings to a currently opened PDF document:
- Freeform

- Line

- Rectangle

- Ellipse

Each tool comes with its own color picker.
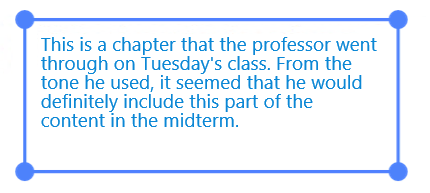
Add Free Text
The Free Text tool allows you to add a text label or even a paragraph to anywhere you like on a PDF document. The free text tool can be used to either add content to the original document or insert commentative notes.
Adding Free Text
- Click the Free Text button

- Click where you want the Free Text to be added
- An text edit box appears to allow you type the body of the text
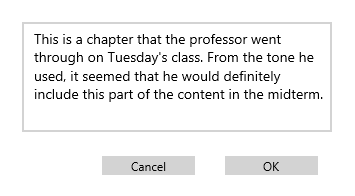
- Click the OK button to insert Free Text
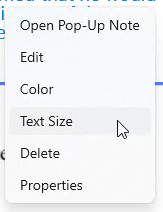
- Open Pop-Up Note: add comments to the Free Text
- Edit: edit the text content of the Free Text
- Color: change font color
- Delete: delete Free Text
- Properties: add Author and Subject to the Free Text
All annotations, including Free Text, also appears in the Annotation Entry List located on the left side of the Main window. You can select an entry, by clicking on it, to jump to the location of that particular annotation.

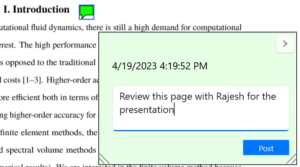
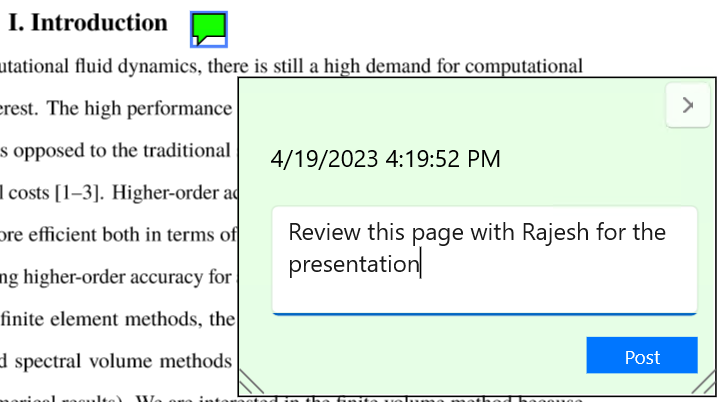
Post Comment
Use the Post Comment tool to insert comments with a minimum yet noticeable presence to the PDF document.
Insert a comment
- Click the Add Comment tool button
 from the functional toolbar
 - Enter text in the comments edit box
- Once completed, click the Post button to insert comment
- Edit text of comment
- Edit author tag
- Change the appearance (icon logo) of the Comment mark
- Change color
- Adjust opacity of the Comment mark
Add Text Callout
The Text Callout feature is useful when adding a comment to a particular location that requires precision on a page.
Add Text Callout
- Click the Text Callout button
 from the functional toolbar
 - Point to exactly where you would like the tip of the callout arrow to be located and click and drag towards the location where the Callout box should be located
Edit Text Callout
To edit the content of a Callout, as well as access a set of editing functions:
- Click to select the Callout, and then
- right-click on the control to bring up the context menu.
The context menu provides access to the following features:
- Edit Callout text
- Add comment to the Callout
- Change font color
- Change font site
- Add Author tag
- Delete the Callout
- PDF Infinity provides two sets of PDF conversion tools that covers a wide range of use case scenarios:
- Convert PDF to documents including Microsoft Office, text, images, and HTML-based files formats
- Convert to PDF from most of aforementioned document types
Note: when there are unsaved changes from any of the currently opened PDF file, you will be prompted to save those changes first prior to using the conversion functions.
Convert PDF to documents
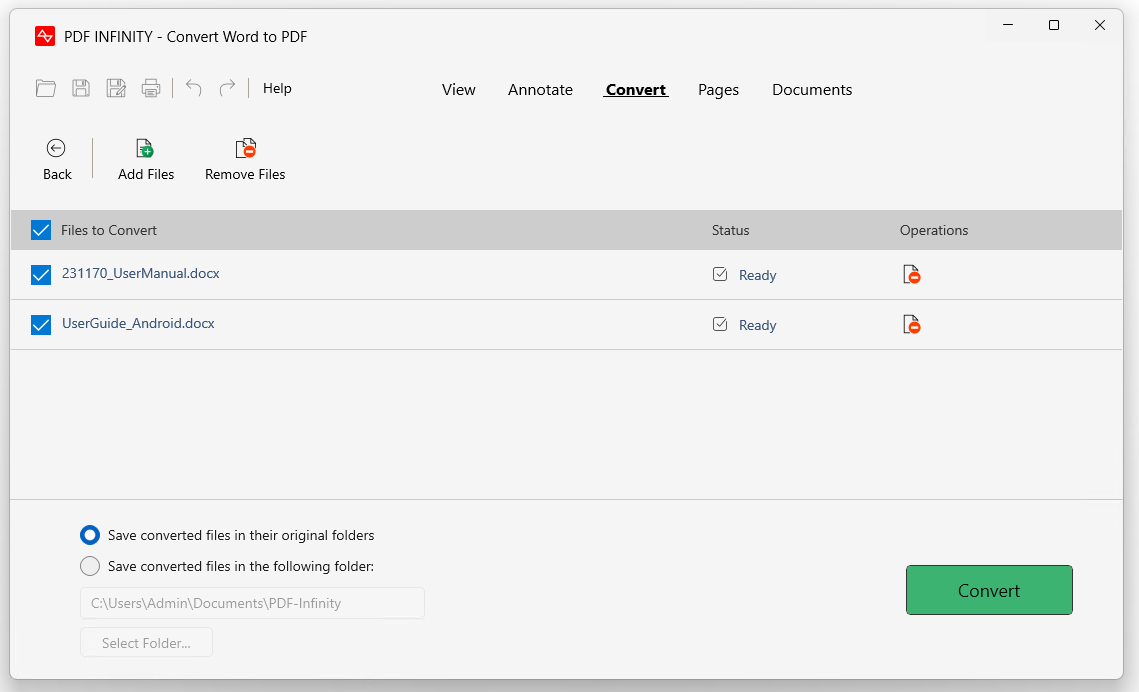
This set of functions include converting Word, Excel, PPTX, Images, RTF, TXT, and HTML files to PDF. Likewise, the conversion process for all supported file types in PDF Infinity follows the same workflow, which includes the following steps:
- Add one or more files
 to the conversion file list
 - If you had add any files by mistake, then select and remove any files
 that are not meant to be converted
 - Set the page page for conversion by typing the starting page number and the ending page number in matching edit boxes. By default the entire page range of each document is selected
- Select (set checkbox to) all files to be converted
- Press the Convert button to start conversion

Conversion options
Output folder locations: This feature allows the user to specify the location where the converted file will be saved. You can choose to save it in the same folder as the source file or select a specific folder using the “Select Folder” button.
Extract text using OCR: This feature enables the user to extract text from scanned PDFs using Optical Character Recognition (OCR). You can select the language of the original text to improve the accuracy of the extracted text during the conversion process
Conversion progress and results
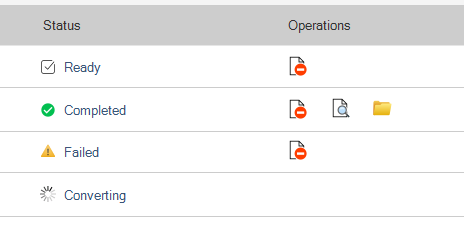
During the conversion process, the application displays the current status of the conversion job as show below. A document conversion status can be in one of the four situations:
- Ready: it is ready for conversion
- Converting: it is being converted
- Failed: it has failed to be converted
- Completed: the conversion has completed with success
Prior to and after a file is converted, you can perform certain operations to the file:
 Remove it from the list
 Open the conversion result using the system default file viewer for the file type
 Open the file folder that contains the converted file
Going back to the main window
Click the Back button ![]() to go back to the Main window from where you can access all other functions again.
to go back to the Main window from where you can access all other functions again.
Convert documents to PDF
This set of functions include converting PDF to Word, Excel, PNG, RTF, TXT, XML, and HTML The conversion process for all supported file types in PDF Infinity follows the same workflow, which includes the following steps:
- Add one or more PDF files to the conversion file list
- If you had add any files by mistake, then select and remove any files that are not meant to be converted
- Set the page page for conversion by typing the starting page number and the ending page number in matching edit boxes. By default the entire page range of each document is selected
- Select (set checkbox to) all files to be converted
- Press the Convert button to start conversion
Conversion options
Output folder locations: This feature allows the user to specify the location where the converted file will be saved. You can choose to save it in the same folder as the source file or select a specific folder using the “Select Folder” button.
Conversion progress and results
During the conversion process, the application displays the current status of the conversion job as show below. A document conversion status can be in one of the four situations:
- Ready: it is ready for conversion
- Converting: it is being converted
- Failed: it has failed to be converted
- Completed: the conversion has completed with success
Prior to and after a file is converted, you can perform certain operations to the file:
- Remove it from the list
- Open the conversion result using the system default file viewer for the file type
- Open the file folder that contains the converted file
Going back to the main window
Click the Back button ![]() to go back to the Main window from where you can access all other functions again.
to go back to the Main window from where you can access all other functions again.
The Pages mode presents a set of functions and tools that help manage pages in a PDF file at both the individual and document level. The main features are:
- Add or insert pages
- Delete pages
- Reorder
- Rotate pages
- Convert and export pages
Page selection
All pages functions work in associate with which and how pages are selected. Pages (i.e. their thumbnails) can be selected in two different ways:
- Selected for Page-level Operations, such as Rotation, Delete, and Export.
- Selection is made by using the checkbox at the top-right corner of a page thumbnail
- When a page is selected, its background is changed to light blue
- Clear the selection by unchecking the checkbox
- Use the Select All
 or Select None
  button for batch selection or de-selection
- Selected (or marked) as the Currently Selected Page, which is used as anchor point for the Add or Insert functions
- Selection is made by single click on the thumbnail
- When a page becomes currently selected, its background is changed to darker blue.
- Clear the selection by another single click on the page thumbnail
- Only one page can be marked as Currently Selected at a time.

In the diagram above, Page 1 is the Currently Selected page, meanwhile, Page 2 through Page 4 are Selected for page-level operations.
Note: a page can be both Currently Selected and Selected for page-level operation.
Add or insert PDF
To add or insert another PDF file (e.g. PDF2) into the current PDF file, (e.g. PDF1) which is displayed in the Pages mode:
- Click on the page at where you would like to insert PDF2. This marks the page as the Currently Selected Page. For instance, you mark page 1 as the currently selected page.
- Click Add PDF
 or select Insert
  > Insert PDF
 - Browse and select the PDF file (that will be PDF2) you would like to insert
- Set how you would like to insert PDF2 by using the Insert PDF Option dialog box shown below
- Click Insert to complete the task
Insert PDF Options
You can specify what to insert from the source file and how to insert to the destination file by using the Insert Option dialog box:
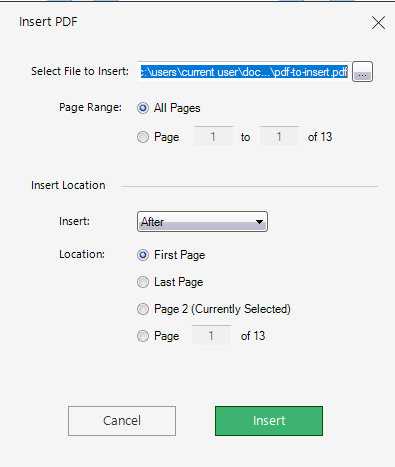
Insert location provides the following features:
- Insert After or Before the Page Location chosen below
- Page Location options:
- First page of the file
- Last page of the file
- the Currently Selected page
- Any page between the first and the last page
Insert a blank page
You can also insert a blank page to anywhere in the current PDF file:
- Click on the page at where you would like to insert a blank page. This marks the page as the Currently Selected Page. For instance, you mark page 1 as the currently selected page.
- Click Insert > Insert Blank Page
- Set how you would like to insert a blank page by using the Insert Blank Option dialog box shown below
- Click Insert to complete the task
Besides the Page Format options, the rest of the option setting dialog box for inserting blank page is very similar to that of the Insert PDF option. Please refer to the section above for more information.
![]()
As mentioned above, the Delete, Rotate, and Export Pages function works with pages that are Selected (with checkbox checked and marked with light blue background).
Delete Pages
- Click the Delete Pages button
 from the functional toolbar
Rotate Pages
- Click the Rotate Left
 or Rotate Right
  buttons from the functional toolbar
Export Pages
- Click the Export button from the functional toolbar
- Select one of the formats options: JPEG, PNG, GIF, BMP, TIFF, and JPEG-XR
- Select the folder to where the exported pages will be stored
Quick operations on a page
![]()
The following operations can be performed on a specific page when hover mouse over the page and click on one of the five floating toolbar buttons:
- Rotate left
- Rotate right
- Insert: Blank page, Image, PDF, Word etc.
- Delete the page
- Export the page
The Documents functional mode provides access to features like Merge, Split, Compress, and Export PDF files
Note: when there are unsaved changes from any of the currently opened PDF file, you will be prompted to save those changes first prior to using the conversion functions.
Merge PDF files
PDF Infinity offers a simple and intuitive list view interface for merging two or more PDF files. This GUI interface is similar across all the features, including Merge, Split, Compress, and Export. Learning about one feature will make it easy to use the others.

Merge options
To merge a set of PDF files:
- Add one or more files to the conversion file list
- If you had add any files by mistake, then select and remove any files that are not meant to be converted
- Adjust the order of merge by using the Move Down
 or Move Up
  button to arrange the order of a PDF file in the list.
 - For each PDF file, set the range of pages to be included by typing the starting page number and the ending page number in matching edit boxes. By default the entire page range of each document is selected
- Select (set checkbox to) all files to be included for merging
- Press the Merge button to start conversion
Output options
Output folder locations: This feature allows the user to specify the location where the merged file will be saved.
Show merged file upon completion: when checked, the application will open Windows explorer, browse to the destination folder, and select the merged file upon completion.
Go back to the main window
Click the Back button ![]() to go back to the Main window from where you can access all other functions again.
to go back to the Main window from where you can access all other functions again.
Split PDF files

Split options
You can batch split a set of PDF files by setting how to split each file individually. There are two ways of splitting a PDF:
- Split a PDF info files of a fixed number of pages: for instance, if you have a 10-page PDF file and the Split Range is set to be 2, then the Split process will generate 5 split PDF files, each containing 2 pages.
- Extra a set of pages as defined by page range marked by the beginning and ending page number.
Output options:
- Store split files in the same folder where the original file came from
- Store all split files in one folder as specified
Go back to the main window
Click the Back button ![]() to go back to the Main window from where you can access all other functions again.
to go back to the Main window from where you can access all other functions again.
Compress PDF files
PDF compression refers to the process of reducing the size of a PDF file without compromising its quality. This is achieved by compressing the data within the PDF file using various compression algorithms, which eliminate redundant and unnecessary information. The resulting compressed PDF file takes up less storage space and can be transmitted more quickly over the internet.

Compress options
You can batch compress a set of PDF files by setting how to compress each file individually. There are three levels of compression:
- Low
- Medium
- High
Output options:
- Store compressed files in the same folder where the original file came from
- Store all compressed files in one folder as specified
Go back to the main window
Click the Back button ![]() to go back to the Main window from where you can access all other functions again.
to go back to the Main window from where you can access all other functions again.
Export PDF files
This is the batch version of the Export function that can also be found from the Pages mode. Use this feature to convert and export PDF files.
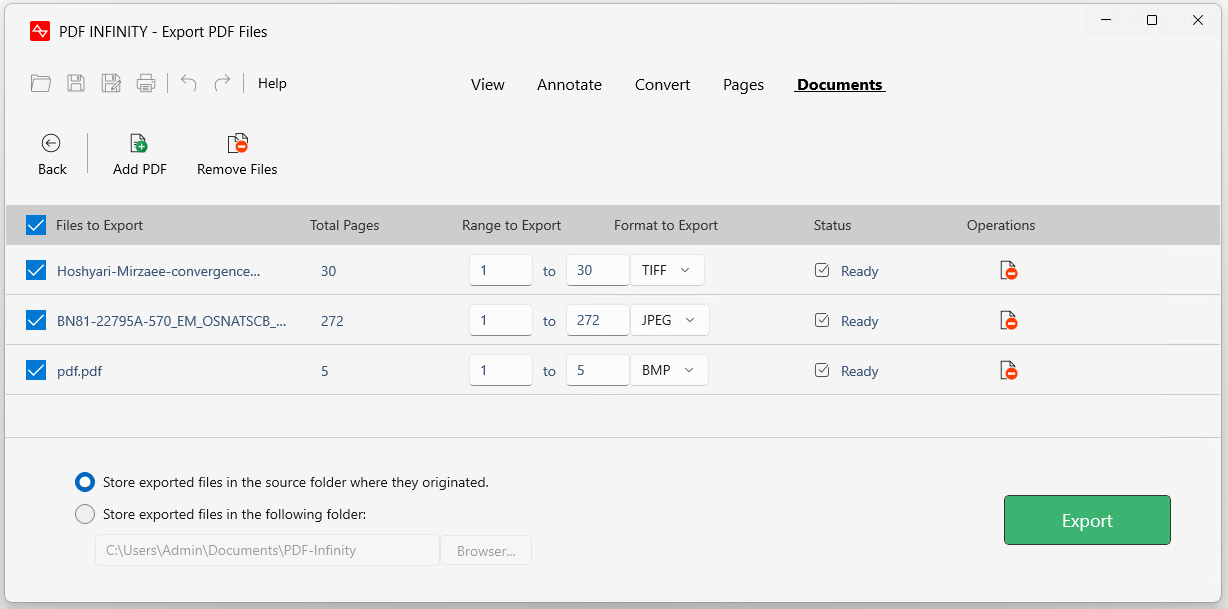
Export options
You can batch export a set of PDF files by setting how to convert each file individually. The options are:
- Select page range
- Select format to export: JPEG, PNG, GIF, TIFF, BMP, JPEG-XR
Output options:
- Store exported files in the same folder where the original file came from
- Store all exported files in one folder as specified
Go back to the main window
Click the Back button ![]() to go back to the Main window from where you can access all other functions again.
to go back to the Main window from where you can access all other functions again.
Access a set of PDF creation tools from the Create PDF section under the Documents mode. Similar to Convert PDF from other types of documents, Create PDF generate help generate a complete PDF file from the entirety of the source document with some useful options.
List of document types
You can create PDF from:
- Blank: generates a blank page
- Word, Excel, PPT
- HTML
- Image files
- Text and RTF
Create PDF options

When creating PDF files, the following options are common to almost all file formats:
- File name: select the output folder and name of the file to be created
- Page size: choose from an extensive list of paper size formats
- Orientation: Portrait or Landscape