Add or Remove Files
The HEIC to JPG Converter app supports both HEIC and HEIF file formats. Use the file list and toolbar buttons to build and manage the list of files for conversion.
Add Files
You can add files using any of the following methods:
Add Files – Click the
 Add Files button on the toolbar to select one or more HEIC/HEIF files.
Add Folders – Click the
 Add Folders button to add all supported images from a selected folder.
Drag and Drop – Drag one or more files directly into the file list area.
Remove Files
Remove a Single File – Click the
 Remove File button next to the file you want to delete from the list.
Remove Multiple Files – Check the boxes
 next to the files you want to remove, then click
  Clear Files on the toolbar.
Repeat these steps as needed until your file list is ready for conversion.
Select Output Format
The HEIC to JPG Converter app lets you convert HEIC or HEIF images to any of the following formats:
JPG, JPEG, PNG, TIFF, BMP, GIF, PDF, PSD, HDR, and WEBP.
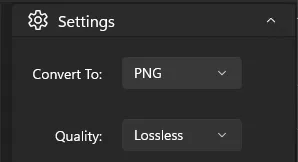
Set the Output Format
Click the Convert to dropdown button.
Select your desired output format from the list.
The Convert to dropdown is located directly above the Convert button in the toolbar area.
Adjust Conversion Quality
Choose from four conversion quality levels to balance image quality and file size:
Lossless – Best image quality, larger file size.
High – Very good quality with moderate file size.
Medium – Balanced quality and file size.
Low – Smallest file size, reduced quality.
Select Lossless for the highest conversion fidelity or Low to minimize storage use.
Note: Output formats such as PDF or PSD may result in larger file sizes because they preserve additional data or layers for better editing and compatibility.
Choose Output Folder
You can decide where the converted files will be saved using one of the following options:
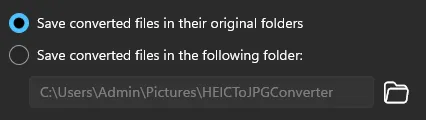
Save converted files in their original folders – Each converted file is saved in the same folder as its source file.
Save converted files in the following folder – All converted files are saved to a single folder of your choice.
These options appear in the bottom-left corner of the conversion window.
Click Browse to select a custom output folder if needed.
Convert Images
Before starting the conversion process, ensure all the images you want to convert are selected.
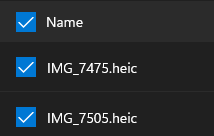
To select all files at once, click the checkbox labeled “Names” in the file list header.
Start Conversion
Click the Convert button to begin the conversion. The app will process the selected files and save them to the specified output folder.
Manage Conversion Results
After conversion, you can manage each converted file using the options in the results list:

Remove File – Removes the entry from the file list.
Open File – Opens the converted file with the default local application.
Open Containing Folder – Opens the folder where the converted file is saved.
View Image Files
You can open and view images in the HEIC to JPG Converter app using any of the following methods:
Add Files – Click the
Add Files button on the toolbar to select one or more HEIC/HEIF or other supported image files.Add Folders – Click the
Add Folders button to add all supported image files from a selected folder.Drag and Drop – Drag one or more files directly into the image viewer window.
All added images are stored in the viewer’s collection, allowing you to browse through them easily.
Clear All Files
To remove all images from the viewer, click Clear Files on the toolbar.
Navigation and Rotation

Navigate Images – Use the Left and Right arrow buttons at the bottom of the image viewer to move through the images in the viewer collection.
Rotate Images – Click the Rotate buttons to rotate images clockwise or counterclockwise as needed.
Note: Rotations are for viewing only. To permanently rotate and save an image, use a dedicated photo editor.
Zoom
The image viewer provides several zoom options to adjust how images are displayed:

Fit Screen – Adjusts the image to fit entirely within the viewer window.
Zoom Out [-] – Decreases the image size to view more of the surrounding workspace.
Zoom In [+] – Increases the image size for a closer view of details.
Use these options to customize your viewing experience for each image.
Other Viewer Functions
The image viewer includes additional tools for managing and using your images:

Save As – Save the current image as a new file in a .JPEG or .PNG format.
Open Folder – Open the folder containing the current image in Windows Explorer.
Print – Send the current image to your printer for a hard copy.
Convert – Add the current image to the conversion list in the HEIC Converter.